
Plantation Guide
Tree Planting Guide
How to plant trees in wire baskets and plastic pots
Before You Begin: A Few Quick Reminders
✅ No Fertilizer Needed in Year One
Our trees are pre-fertilized to carry them through their first growing season. Avoid adding fertilizer immediately after planting — it can shock the roots.
💧 Water Wisely
We highly recommend using Tree Watering Bags for all new plantings — these support deep, even watering and reduce transplant shock. 🛒 Available at Alberta Tree Farms — ask us!
Part 1: How to Plant Trees in Wire Baskets
Best for: Large caliper trees, balled-and-burlapped (B&B), and field-grown specimens.
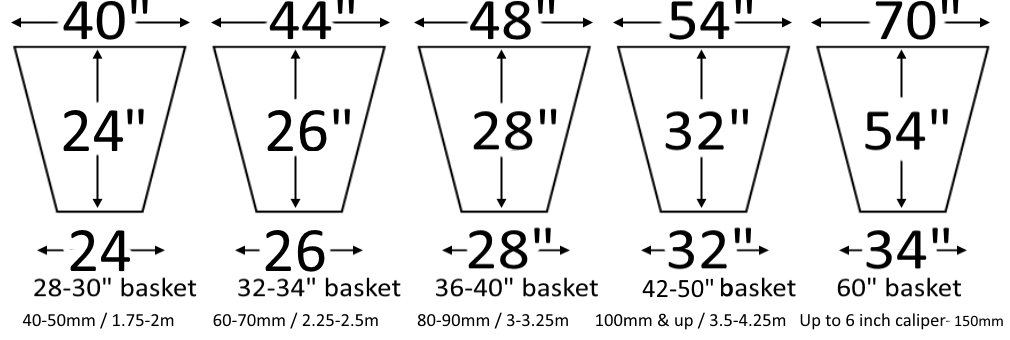
Recommended hole size
🔨 Step-by-Step Instructions
Step 1: Prepare the Hole in Advance
Dig a hole 2 to 2.5× wider than the wire basket and the same depth as the root ball.
Fill the base of the hole with a few gallons of water to hydrate the subsoil. Let it absorb before placing the tree.
📏 Depth Check Place a shovel handle or stake across the hole and measure to ensure the root ball will sit level with, or slightly above, ground level.
Step 2: Position the Tree
Gently lower the tree into the hole with equipment or by hand, keeping the basket intact.
The top of the root ball should sit at grade or 1–1.5 inches above, especially if the soil is loose or recently disturbed.
🚫 Do not bury the trunk flare or plant too deep — roots need oxygen!
Step 3: Backfill (Part 1)
Start filling the hole halfway with screened topsoil or loam.
Use your hands, feet, or shovel handle to lightly tamp and remove air pockets.
Ensure the tree remains straight during this step.
Step 4: Remove Straps & Trim Basket
Cut and remove all nylon or white strapping at the top of the basket — these do not decompose.
With bolt cutters, carefully remove the top 1/3 of the wire basket to allow roots to expand.
Watch for sharp edges — gloves are essential.
Step 5: Peel Back Burlap
Cut away the top 1/3 of the burlap in line with the basket removal.
Leave the lower portion intact — natural burlap will decompose safely underground.
Synthetic burlap? Remove it entirely — it won’t break down.
Step 6: Finish Backfilling
Continue filling the hole with the same high-quality soil.
Tamp firmly around the root ball as you go — don’t stomp aggressively.
The tree should be stable, upright, and slightly mounded, not sunken.
Step 7: Create a Watering Well
Build a 5-inch high “donut” berm with extra soil in a 2–3 foot radius.
This well helps water reach the root zone without running off.
Step 8: Mulch Properly
Apply 2–3 inches of bark mulch inside the well area.
Keep mulch 2–3 inches away from the trunk to prevent trunk rot and insect damage.
Mulch suppresses weeds and helps soil retain moisture.
Step 9: Water Thoroughly
Fill the water well completely after planting.
Continue watering 1–2 times per week (more during heat or wind) for the first growing season.
Use a Tree Gator watering bag for hands-free, slow-release watering.
📘 See our Tree Care Guide for detailed watering and maintenance schedules.
Part 2: How to Plant Trees & Shrubs from Plastic Pots
Best for: Container-grown ornamentals, flowering trees, and small deciduous/conifers.
Recommended plant hole size

🧤 Step-by-Step Instructions
Step 1: Dig the Hole
Dig a hole 1.5 to 2× wider than the container and 2 inches deeper than the root ball.
Loosen surrounding soil to promote root exploration.
Step 2: Remove the Pot & Prep the Roots
Slide the pot off gently (tap sides if needed).
Loosen circling roots by gently teasing them with your hands or slicing vertically with a knife in 3–4 spots around the root ball.
🔁 This encourages outward growth and reduces transplant shock.
Step 3: Set the Tree at Grade
Add 2 inches of fresh soil to the hole bottom.
Place the root ball so the top sits at or just above surrounding soil level.
Step 4: Backfill Halfway
Use screened topsoil to fill halfway up.
Lightly tamp to eliminate voids and air pockets.
Step 5: Finish Backfilling
Fill to the top of the root ball, tamping gently to secure the plant.
Avoid compressing too much — roots need oxygen.
Step 6: Create a Watering Well
Form a 2–3 inch high ring of soil around the planting zone.
This helps water collect and absorb instead of running off.
Step 7: Add Mulch
Apply 1–2 inches of mulch around the planting area.
Keep mulch away from the trunk or main stem by 2–3 inches.
Step 8: Water Generously
Water deeply and thoroughly after planting.
Monitor soil moisture every 2–3 days for the first few weeks.
Tree watering bags or drip lines can help maintain consistent hydration.
💧 Bonus Tip: Use a Tree Watering Bag
Why we recommend Tree Gator or similar bags:
✔️ Delivers slow, deep watering directly to the roots
✔️ Minimizes transplant shock
✔️ Convenient for sites without irrigation or for absentee owners
🛒 Available at Alberta Tree Farms — talk to us about sizing and installation.
Questions or Custom Planting Needs?
Reach out to our team — we’re happy to recommend species-specific planting methods, provide site evaluations, or supply watering bags with your order.